Friday, 25 October 2013

Using Microsoft system tools

If you open the start menu, select accessories, then system tools you' ll see a set of tools which can be used to improve the performance of your system or run some maintenance

Here we'll talk about the defregmenter, clean up and system restore. These are three of the main tools to maintain or restore your system.

The Defrag arranges the files that are saved on the HDD in a way that can be accessed faster, this way files load faster. Once you open the disk defragmenter you choose which HDD you want to defrag and click defrag than a sort of graph will appear, it will show how the files are fragmented. If the disk is SSD it does not need defragmentation.


Disk Clean up cleans unused files on your system it also deletes old system files, temporary files and other files that slow down your system. Once the disk clean up is opened you need to select which HDD you want to clean and click ok. This might take some time, after it loads you will see a screen with check boxes, once you select what you want cleaned click ok and a pop up will appear, it will ask you if you are sure you want to delete them. Click yes and wait till the process is finished.


The system restore can be used to save you from formatting, It restores the system back to a selected dates, these dates are times when windows made updates or you installed new drivers, to be safe create restore points after every update so that you have plenty of restore points including recent and older ones.

To create a restore point open the start menu and type "create a restore point".
Click on "create" and write the name you want to give the restore point.


In order to restore the system you go to the start menu and type "system restore" or find it manually. Once you open it you click next, select the restore point you want and next again then follow the wizard. Once done the settings will be like those of the day the restore point was created.


Monday, 10 December 2012

How to Clean your PC (Hardware)

In order to properly clean you desktop computer you need to open the case so that you can remove the dust from the fans or you risk that they don t cool enough and your system overheats, so cleaning every now and then is important.

All you need is a screw driver, a cup or saucer to place the screws in it so you don't loose any and a brush to clean with. If you want a can of dry compressed air is also good, but do not use an air compressor as the pressure is to high and water particles are not separated from the air so damage to components might be made.

 Place the tower on a clean solid surface such as the kitchen table at home. Start by undoing the back screws that are on the opposite side of the ports these are marked with red circle in the picture below. If needed you can also undo the other side to have  better access these are marked in blue in the picture below. Try to avoid undoing the mother-board screws as cables might be tight and you risk pulling a connection or cut a wire, the motherboard screws are marked with green circles in the picture below and the position might not be the same on all towers but can be identified because they do not go through the case.


Now just pull the side back and you have the case open. Next put the tower on it's side and with the brush gently clean all the dust from your components especially the cooling fans as these are prone to clogging. If you have the can of compressed air spray the air onto the fans and around the mother-board including empty  PCI slots to help keep them clean, but do not spray for longer than a few seconds or water will build up.


Make sure all the connections are connected properly and there are no loose connections, flip the tower  back to and upright position and assemble the side again, tighten all screws and plug back in place. Turn it on and enjoy your cleaned computer.

Sunday, 9 December 2012

Format from dos

In this post I will explain how to format your pc.

First you need an original copy of the operating system which usually comes on a CD (this can be copied on a pen-drive). You will need to turn on your computer and insert the CD, then restart the system. When the first screen appears choose boot options, on some computers this is F2. Some mother boards  don't have this option so you need to enter setup (usually delete).


Once you are in the setup find boot manager and choose CD or USB depending on where the operating system is stored. Restart the computer again and when the press any key to boot from CD/USB appears press any key.

Now the operating system will start loading and you will have to wait a few minutes until it copies all temporary files to the HDD.

Here I will describe how to install Windows as this is the most common OS in Malta, but Linux is very similar to install.

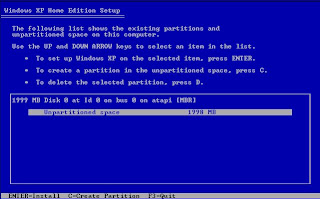
When the windows finishes loading it will ask if you want to repair, update or install a new copy. In this blog well select new copy. The next screen will ask you to create a partition.

You can create as many partitions as you like but the one that the OS is going to be installed on has a minimum required size. Once all partitions are created you select the one you're using for the OS and press enter.

After all that is done follow the wizard and windows will start installing, again this might take a few minutes to finish even hours, the duration depends on your system.

When your PC finishes installing and reboots DO NOT boot from CD let it boot from the HDD so the installation finishes. When it is almost done it will ask for some information like usernames, accounts passwords, time, date, location, ect...

 When you log in for the first time and you see everything is working you can remove the CD and enjoy you Operating system.


The video above shows how to make a bootable pendrive for people who don t have a CD drive.

Click Here to go to Microsoft store to buy your copy of Windows.
Click Here to download Linux Ubuntu for free